

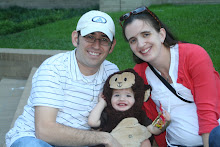
Man, how many of these have I churned out since I found out Lizzie was going to be a girl? Anyhoo, a friend of mine from college contacted me last week and she is on bedrest with her first, a little girl. She wanted a tutorial for the flower clips that Janie is wearing in all of her monthly pics. While I've made TONS, I've never written a tutorial. In fact, I have sort of side stepped tutorials in my time as a blogger for one main reason.... I'm a photo snob. Yup, it's true. With three tiny kids, my only time to craft is at night and that means flash photography.... the horror! Anyway, I decided to break my fast for the good of my very bored friend and her accessory deprived baby :)
Sooooo, step one.... Cut 7 strips each of two different ribbons. It is best if the one you use on the inside is thinner than the outer ribbon and it will be cut a little shorter than the ribbon you are using for the outer petals~

To be honest, this maroon ribbon (it is maroon, I swear... flash photography claims another victim) is wider than I like to use, but I was trying to match an A&M flower I had made previously for Lizzie and all I had was this wider version of the ribbon. To figure out how long to cut your ribbon, go ahead and fold it into a petal (think an awareness ribbon without the tails) and adjust the size until you get something you're happy with~

Fold the inner ribbon in the same way and fit it inside the larger ribbon to determine how long that ribbon needs to be cut~

Now take out your handy dandy glue gun and use a small dot of glue at the base of each petal to secure the ribbon to itself. Do you already have hot glue callouses on your fingers? If not, you may by the end of this step :) Seriously though, hot glue guns are the quickest way to develop impenetrable, feel no heat, mom hands... word.

Now, begin to assemble your outer flower by using a small dot of glue at the base of each petal to adhere them in a circle. You may need to lay them out ahead of time to get an idea for how much overlap to use... at this point I just do it on instinct.

Congratulations! How are those callouses working out for ya? Ok, now at this point, keep the same center and start adding the inner petals one by one...

Until your inner flower is also complete.... YAY!

Ok, it looks weird now, but the button will pull it all together. At this point I would look at every angle of the flower and figure out which petals you like best. It sounds nuts, and it probably is, but let your OCD flag fly! I find there is always a certain part that looks like the top to me, so I put it on top. Then when I add my button I line the holes in it up with my favorite view of the flower. Big dab of hot glue in the middle, add the button and you're almost done!

These are the best hair clips. Seriously, don't waste your time with others. Sally Beauty Supply... ok? Ok.

I always attach my flowers to clips and clip them onto headbands so that I can use them just as clips when baby becomes toddler, or preschooler, or 6 yr old... what have you. Now you just use hot glue to ribbon wrap the clip...

This will protect baby's head and I use grosgrain ribbon which adds some traction when it's in her hair.

Some glue on your clip, slap on your flower and you're done! I usually do one dot of glue in the center of the clip and glue down the back middle of the flower. Once that is set, I glue a few petals along the clip to keep the flower firmly in place. Make sure to glue it on the clip in such a way that it faces the direction you like when it's clipped to a headband later.

See, the thinner ribbon on the top one is WAY cuter. So, if you aren't in a hurry like me then try to match your ribbon width to the size of flower you are making. Here are some more I've done recently~

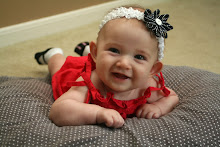
You can see the blue one above that only has one layer... that works great too, I just like the layered look. Jane loves her June flower!~


4 comments:
Thanks, Abby! They look so fun, and I can't wait to start making them! Do you use 3/8 ribbon for the outside and 1/4 for the inside?
She really does look like she appreciates he pretty flower!
And I think you are SO clever!!
Gran
OK, here's another question. I guess I could go with trial and error, but since you've made so many and figured it all out :), about how long do you cut your ribbons? I made one last night, but it turned out a little small and squished.
Christy~ I use 3/8 ribbon for the outer and inner... at least that's what they say :) My inner ribbon is actually between 1/4 and 3/8 but it's label says 3/8. My outer ribbons usually run about 4 inches and the inner are closer to 3 inches.
Post a Comment